深度学习:玩转Caffe
引言
最近实验中又跟caffe打交道,虽然caffe好用,但是要想让caffe启动训练起来,还真得费一番功夫。数据处理,模型文件编写,预训练模型的选择等等。
ImageNet的数据预处理
1. 常见image list
1 | !/bin/bash |
2. 生成backend为leveldb或者lmdb
1 | !/usr/bin/env sh |
3. proto中配置使用
1 | layer { |
其中具体的参数需要参考caffe.proto文件进行查看,进行正确的配置
训练模型
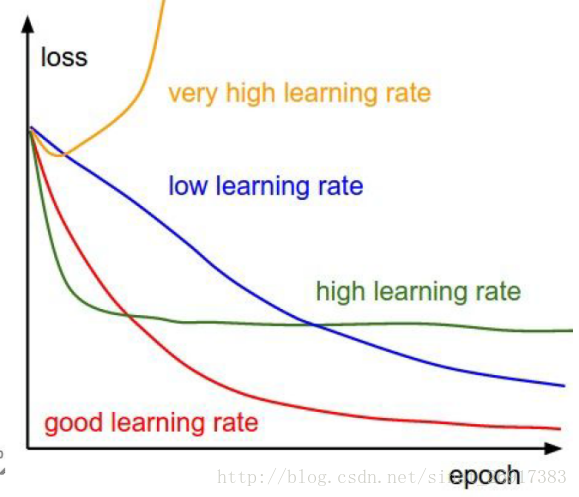
1、学习率
步长的选择:你走的距离长短,越短当然不会错过,但是耗时间。步长的选择比较麻烦。步长越小,越容易得到局部最优化(到了比较大的山谷,就出不去了),而大了会全局最优。一般来说,如ResNet前32k步,很大,0.1;到了后面,迭代次数增高,下降0.01,再多,然后再小一些。

2、caffe训练时Loss变为nan的原因1
由小变大易出nan
原因:有小变大过程中,某个梯度值变得特别大,使得学习过程难以为继
例如:10x10x256的输入,输出如果是20x20x256或者10x10x512,如果是使用Inception-ResNet-v2或者直接进行卷积操作,很容易出现nan的情况。
具体解决方案: - 参考Inception的设计原则重新设计网络 - 添加Batch normalization试试
使用ResNet-Block或者Inception技术,最后的结果通过Bitwise Operation进行组合,而不是采用按channel Concatenate进行的。
尤其是BitWise multi进行组合的时候,往往会产生很大的数据悬殊,会导致梯度爆炸现象从而出现Loss 为nan
3、梯度爆炸
原因:梯度变得非常大,使得学习过程难以继续
现象:观察log,注意每一轮迭代后的loss。loss随着每轮迭代越来越大,最终超过了浮点型表示的范围,就变成了NaN。
措施: -
减小solver.prototxt中的base_lr,至少减小一个数量级。如果有多个loss layer,需要找出哪个损失层导致了梯度爆炸,并在train_val.prototxt中减小该层的loss_weight,而非是减小通用的base_lr。
- 设置clip gradient,用于限制过大的diff
不当的损失函数
原因:有时候损失层中loss的计算可能导致NaN的出现。比如,给InfogainLoss层(信息熵损失)输入没有归一化的值,使用带有bug的自定义损失层等等。
现象:观测训练产生的log时一开始并不能看到异常,loss也在逐步的降低,但突然之间NaN就出现了。
措施:看看你是否能重现这个错误,在loss layer中加入一些输出以进行调试。 示例:有一次我使用的loss归一化了batch中label错误的次数。如果某个label从未在batch中出现过,loss就会变成NaN。在这种情况下,可以用足够大的batch来尽量避免这个错误。
不当的输入
原因:输入中就含有NaN。
现象:每当学习的过程中碰到这个错误的输入,就会变成NaN。观察log的时候也许不能察觉任何异常,loss逐步的降低,但突然间就变成NaN了。
措施:重整你的数据集,确保训练集和验证集里面没有损坏的图片。调试中你可以使用一个简单的网络来读取输入层,有一个缺省的loss,并过一遍所有输入,如果其中有错误的输入,这个缺省的层也会产生NaN。
4、Caffe Debug info23
当我们训练过程面临nan,
loss不收敛的情况,可以打开solver.prototxt中的debuf_info:true进行查错。
    I1109 ...]     [Forward] Layer data, top blob data data: 0.343971
    I1109 ...]     [Forward] Layer conv1, top blob conv1 data: 0.0645037
    I1109 ...]     [Forward] Layer conv1, param blob 0 data: 0.00899114
    I1109 ...]     [Forward] Layer conv1, param blob 1 data: 0
    I1109 ...]     [Forward] Layer relu1, top blob conv1 data: 0.0337982
    I1109 ...]     [Forward] Layer conv2, top blob conv2 data: 0.0249297
    I1109 ...]     [Forward] Layer conv2, param blob 0 data: 0.00875855
    I1109 ...]     [Forward] Layer conv2, param blob 1 data: 0
    I1109 ...]     [Forward] Layer relu2, top blob conv2 data: 0.0128249
    .
    .
    .
    I1109 ...]     [Forward] Layer fc1, top blob fc1 data: 0.00728743
    I1109 ...]     [Forward] Layer fc1, param blob 0 data: 0.00876866
    I1109 ...]     [Forward] Layer fc1, param blob 1 data: 0
    I1109 ...]     [Forward] Layer loss, top blob loss data: 2031.85
    I1109 ...]     [Backward] Layer loss, bottom blob fc1 diff: 0.124506
    I1109 ...]     [Backward] Layer fc1, bottom blob conv6 diff: 0.00107067
    I1109 ...]     [Backward] Layer fc1, param blob 0 diff: 0.483772
    I1109 ...]     [Backward] Layer fc1, param blob 1 diff: 4079.72
    .
    .
    .
    I1109 ...]     [Backward] Layer conv2, bottom blob conv1 diff: 5.99449e-06
    I1109 ...]     [Backward] Layer conv2, param blob 0 diff: 0.00661093
    I1109 ...]     [Backward] Layer conv2, param blob 1 diff: 0.10995
    I1109 ...]     [Backward] Layer relu1, bottom blob conv1 diff: 2.87345e-06
    I1109 ...]     [Backward] Layer conv1, param blob 0 diff: 0.0220984
    I1109 ...]     [Backward] Layer conv1, param blob 1 diff: 0.0429201
    E1109 ...]     [Backward] All net params (data, diff): L1 norm = (2711.42, 7086.66); L2 norm = (6.11659, 4085.07)
At first glance you can see this log section divided into two:
[Forward] and [Backward]. Recall that neural
network training is done via forward-backward propagation: A training
example (batch) is fed to the net and a forward pass outputs the current
prediction. Based on this prediction a loss is computed. The loss is
then derived, and a gradient is estimated and propagated backward using
the chain rule.
Caffe Blob data structure
Just a quick re-cap. Caffe uses Blob data structure to store
data/weights/parameters etc. For this discussion it is important to note
that Blob has two "parts": data and
diff. The values of the Blob are stored in the data part.
The diff part is used to store element-wise gradients for the
backpropagation step.
Forward pass
You will see all the layers from bottom to top listed in this part of the log. For each layer you'll see:
    I1109 ...]     [Forward] Layer conv1, top blob conv1 data: 0.0645037
    I1109 ...]     [Forward] Layer conv1, param blob 0 data: 0.00899114
    I1109 ...]     [Forward] Layer conv1, param blob 1 data: 0
Layer "conv1" is a convolution layer that has 2 param blobs: the
filters and the bias. Consequently, the log has three lines. The filter
blob (param blob 0) has data
I1109 ...] [Forward] Layer conv1, param blob 0 data: 0.00899114That is the current L2 norm of the convolution filter weights is
0.00899. The current bias (param blob 1):
I1109 ...] [Forward] Layer conv1, param blob 1 data: 0meaning that currently the bias is set to 0.
Last but not least, "conv1" layer has an output, "top" named "conv1" (how original...). The L2 norm of the output is
I1109 ...] [Forward] Layer conv1, top blob conv1 data: 0.0645037Note that all L2 values for the [Forward] pass are reported on the data part of the Blobs in question.
Loss and gradient
At the end of the [Forward] pass comes the loss layer:
    I1109 ...]     [Forward] Layer loss, top blob loss data: 2031.85
    I1109 ...]     [Backward] Layer loss, bottom blob fc1 diff: 0.124506
In this example the batch loss is 2031.85, the gradient of the loss
w.r.t. fc1 is computed and passed to diff part
of fc1 Blob. The L2 magnitude of the gradient is 0.1245.
Backward pass
All the rest of the layers are listed in this part top to bottom. You can see that the L2 magnitudes reported now are of the diff part of the Blobs (params and layers' inputs).
Finally
The last log line of this iteration:
[Backward] All net params (data, diff): L1 norm = (2711.42, 7086.66); L2 norm = (6.11659, 4085.07)reports the total L1 and L2 magnitudes of both data and gradients.
What should I look for?
- If you have nans in your loss, see at what point your data or diff turns into nan: at which layer? at which iteration?
- Look at the gradient magnitude, they should be reasonable. IF you are starting to see values with e+8 your data/gradients are starting to blow off. Decrease your learning rate!
- See that the diffs are not zero. Zero diffs mean no gradients = no updates = no learning.
Tools事半功倍
1、caffe tools
caffe可执行文件可以有不同的选项进行选择功能,功能选择是通过功能函数指针注册的方式实现的,在tools/caffe.cpp中有,其中的注册功能部分大家有兴趣可以学习一下,这块还是很有趣的。
2、分析train log
在caffe/tools/extra下有分析log的各种脚本,你可以使用gnuplot继续绘制,也可以采用python的matplot
如果想提取log的关键信息,可以查看
parse_log.sh或者parse_log.py如果想绘制采用绘制
python tools/extra/plot_training_log.py 2 examples/ooxx/result/result.png jobs/ResNet/VOC0712/OOXX_321x321/ResNet_VOC0712_OOXX_321x321.log
This script mainly serves as the basis of your customizations. Customization is a must. You can copy, paste, edit them in whatever way you want. Be warned that the fields in the training log may change in the future. You had better check the data files and change the mapping from field name to field index in create_field_index before designing your own plots.
Usage:
    ./plot_training_log.py chart_type[0-7] /where/to/save.png /path/to/first.log ...
Notes:
    1. Supporting multiple logs.
    2. Log file name must end with the lower-cased ".log".
Supported chart types:
    0: Test accuracy  vs. Iters
    1: Test accuracy  vs. Seconds
    2: Test loss  vs. Iters
    3: Test loss  vs. Seconds
    4: Train learning rate  vs. Iters
    5: Train learning rate  vs. Seconds
    6: Train loss  vs. Iters
    7: Train loss  vs. Seconds
3、显示模型结果
classification
1 | ./build/examples/cpp_classification/classification.bin \ |
The output should look like this:
1 | ---------- Prediction for examples/images/cat.jpg ---------- |
ssd_detection
stairsNet detection
其中需要配置一些依赖文件信息
1 | # caffe的root路劲 |
4、对多个snapshot模型进行打分
- 首先运行模型自带的score脚本,
如
examples/ssd/score_ssd_pascal.py,该脚本会调用当前最新的model进行评测,在jobs的子目录下生成一个XXXXX_score的路径,其中包含solver.prototxt等等文件。然后ctrl+C暂停运行。 - 运行脚本
model score script(先去玩几个小时,时间很漫长的...),将会在jobs的某个路径下找到生成的各个模型对应的shell脚本和log文件。
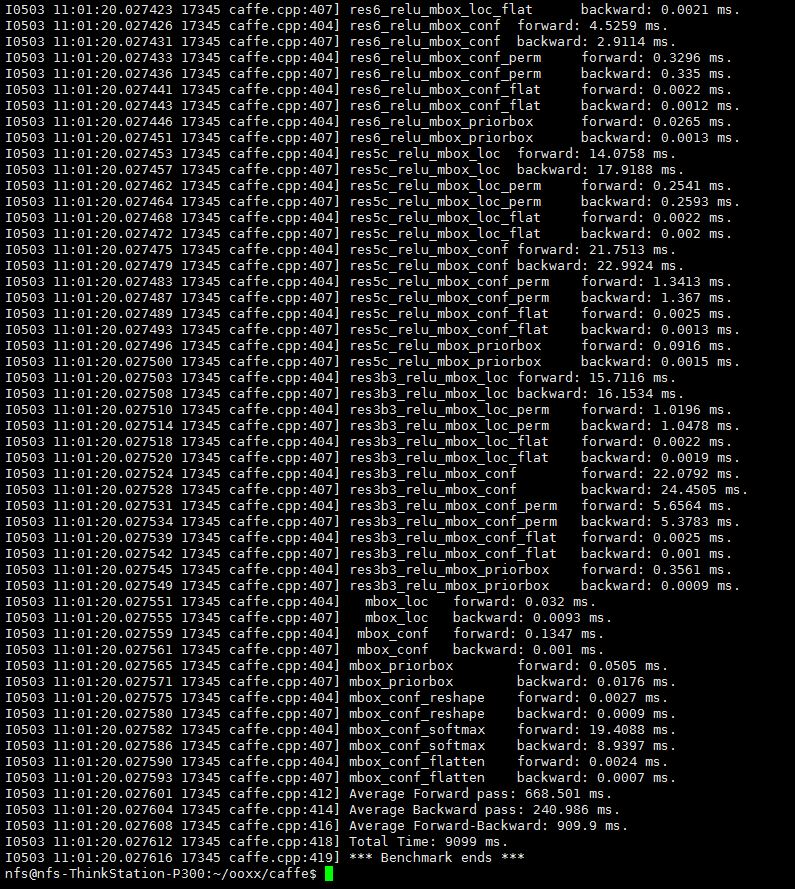
5、Inference Time4
- (These example calls require you complete the LeNet / MNIST example
first.) time LeNet training on CPU for 10 iterations
./build/tools/caffe time -model examples/mnist/lenet_train_test.prototxt -iterations 10 - time LeNet training on GPU for the default 50 iterations
./build/tools/caffe time -model examples/mnist/lenet_train_test.prototxt -gpu 0 - time a model architecture with the given weights on no GPU for 10
iterations
./build/tools/caffe time --model=models/ResNet/VOC0712/OOXX_321x321/deploy.prototxt --weights models/ResNet/VOC0712/OOXX_321x321/ResNet_VOC0712_OOXX_321x321_iter_115000.caffemodel --iterations 10
为什么要用Google Protocol Buffer序列化协议?5
| # | protobuf | jackson | xstream | serialization | hessian2 | hessian2压缩 | hessian 1 |
|---|---|---|---|---|---|---|---|
| 序列化 ns | 1154 | 5421 | 92406 | 10189 | 26794 | 100766 | 29027 |
| 反序列化ns | 1334 | 8743 | 117329 | 64027 | 37871 | 188432 | 37596 |
| bytes | 97 | 311 | 664 | 824 | 374 | 283 | 495 |
protobuf 不管是处理时间上,还是空间占用上都优于现有的其他序列化方式。内存暂用是java序列化的1/9, 时间也是差了一个数量级,一次操作在1us左右。缺点:就是对象结构体有限制,只适合于内部系统使用。
json格式在空间占用还是有一些优势,是java序列化的1/2.6。序列化和反序列化处理时间上差不多,也就在5us。当然这次使用的jackson,如果使用普通的jsonlib可能没有这样好的性能,jsonlib估计跟java序列化差不多。
xml相比于java序列化来说,空间占用上有点优势,但不明显。处理时间上比java序列化多了一个数量级,在100us左右。
以前一种的java序列化,表现得有些失望
hessian测试有点意外,具体序列化数据上还步入json。性能上也不如jackjson,输得比较彻底。
hessian使用压缩,虽然在字节上有20%以上的空间提升,但性能上差了4,5倍,典型的以时间换空间。总的来说还是google protobuf比较给力 以后在内部系统,数据cache存储上可以考虑使用protobuf。跟外部系统交互上可以考虑使用json。
开发过程中一些问题
1. 如果一直在如下位置夯住,不继续运行了的话:
1 | layer { |
可能是训练数据类型是对的,但是去取过程中出现了,这个时候就要检查是不是训练数据的使用的是测试数据的地址。我就是犯了 这么错误,找了好久终于找到了。
2. 进行模型funetune的时候,prototxt和.caffemodel一定要对应,否则真的会出现各种shape size不匹配的问题
3. 编写prototxt的时候要风格统一。不要layers和layer模式混用。
风格1: Layers开头,type为全部大写不带引号
1 | layers { |
风格2:layer开头,类型为首字母大写的字符串
1 | layer { |
风格3:layers和layer嵌套类型
1 | layers { |
编写的时候保持风格统一就好。
参考文献
estimate Inference time from average forward pass time in caffe↩︎
http://agapple.iteye.com/blog/859052↩︎
