啊哈, 颤抖吧工具

Document

部署

名称 功能简介 其他
netron2 可视化模型, 如果要临时修改模型,可以使用onnx-modifier3 onnx.shape_inference推理优化后的模型,可以将结果显示在netron中
onnxsim4 对onnx模型进行op融合,常量折叠等操作 部分功能也能在onnx.optim模块中找到,常用的版本为v0.3.10
ploygraphy5 包括多种模式,实现对onnx模型的运行、优化等
trtexec6 tensorrt官方提供的用于能够快速使用tensorrt推理模型的工具,主要功能包括对模型benchmark,构建GIE模型等
onnx_graphsurgeon7 常用于onnx模型裁剪、修改
NVTX+Nsight Systems 精确查看每个op所占用的host/device时间等

可视化

服务压测工具

locust -f locust_file.py --host="" --headless -u 12 -r 20 -t 10m

其中locust_file.py需要如下定义:

1
2
3
4
5
6
7
8
9
10
11
12
13
14
15
16
17
18
19
20
21
22
23
24
import json
import glob
import random
import base64
from locust import HttpUser, task

fnames = list(glob.glob("./images/*"))
def build_request():
fname = random.choice(fnames)
buffer = open(fname, "rb").read()
req = json.dumps({
"image": base64.b64encode(buffer).decode("utf-8"),
})
return req


class MyUser(HttpUser):
@task
def process(self):
req_data = build_request()
with self.client.post("/api_name", data=req_data) as res:
if res.status_code != 200:
print("Didn't get response, got: " + str(res.status_code))

自动负载均衡

gunicorn

应用 TensorRT 部署模型常用开发工具

我们总结了在使用 TensorRT 部署AI算法模型过程中常用到的几个工具:

名称 功能简介 其他
netron 可视化模型, 如果要临时修改模型,可以使用 onnx-modifier onnx.shape_inference推理后的模型,可以将结果显示在 netron 中
onnxsim 对 ONNX 模型算子融合,常量折叠等操作 部分功能也能在 onnx.optim 模块中找到
polygraphy 包括多种模式,实现对 ONNX 模型的运行、优化、转换到 TensorRT 以及精度对比等功能
trtexec TensorRT 官方提供的用于能够快速使用 TensorRT 推理模型的工具,主要功能包括对模型 benchmark ,构建 TensorRT 模型等
onnx_graphsurgeon 常用于 ONNX 模型裁剪、修改
NVTX+Nsight Systems NVIDIA 官方提供的针对开发过程中,CPU/GPU 时间占用等信息进行收集和分析的功能。

常用工具使用案例

onnx-graphsurgeon

TensorRT 官方提供了关于 onnx-graphsurgeon 操作 ONNX 模型的 example ,例如剥离子图移除Node子图替换等等。

例如我们将原来的 decoder_step 这个节点进行修改,修改成直接传入已经构造好的 postion_ids 的方式:

1
2
3
4
5
6
7
8
9
10
11
12
13
14
15
16
17
18
19
import onnx
import onnx_graphsurgeon as gs
import numpy as np

def replace_onnx(onnx_path = "decoder.onnx"):
graph = gs.import_onnx(onnx.load(onnx_path))
tensors = graph.tensors()
# replace subgraph
shape_node = [node for node in graph.nodes if node.name == "Mul_101"][0]
inputs_mask = tensors["decode_step"]
inputs_mask.name = "position_ids"
step_matrix = inputs_mask.to_variable(dtype=np.float32, shape= ['batch', 1, 512])
add_node = [node for node in graph.nodes if node.name == "Add_114"][0]
add_node.inputs = [shape_node.outputs[0], step_matrix]
graph.cleanup()
onnx.save(gs.export_onnx(graph), onnx_path.replace(".onnx", "-replace.onnx"))

if __name__ == "__main__":
replace_onnx(path="output/decoder.onnx")

trtexec

trtexec 工具有三个主要用途

  • 用随机或用户提供的输入数据对模型进行基准测试
  • 用于生成 TensorRT 模型,例如:
1
2
3
4
5
trtexec --onnx=output/transformer-decoder-input_mask.onnx   \
--minShapes=input_ids:1x2x1,memory_bank:1x2x512,memory_lengths:2x1,position_ids:1x1x512 \
--optShapes=input_ids:1x16x1,memory_bank:64x16x512,memory_lengths:16x64,position_ids:64x1x512 \
--maxShapes=input_ids:1x128x1,memory_bank:256x128x512,memory_lengths:128x256,position_ids:256x1x512 \
--saveEngine=output/output/transformer-decoder-input_mask_T4_fp16_8.5.1.7.engine --fp16 --verbose
  • 基于构建器生成序列化时序缓存

polygraphy

  • inspect模式下,可以查看模型结构,输入/输入信息等,例如:
1
polygraphy inspect model identity.onnx --show layers
1
2
3
4
5
6
7
8
9
10
11
12
13
14
15
16
[I] ==== ONNX Model ====
Name: test_identity | ONNX Opset: 8

---- 1 Graph Input(s) ----
{x [dtype=float32, shape=(1, 1, 2, 2)]}

---- 1 Graph Output(s) ----
{y [dtype=float32, shape=(1, 1, 2, 2)]}

---- 0 Initializer(s) ----
{}

---- 1 Node(s) ----
Node 0 | [Op: Identity]
{x [dtype=float32, shape=(1, 1, 2, 2)]}
-> {y [dtype=float32, shape=(1, 1, 2, 2)]}
  • polygraphy run 模式下,查看一个 ONNX 模型是否被 TensorRT/OnnxRuntime 支持,相比较 trtexec 可以采用默认的输入,该模式下也集成了逐层对比输出结果的功能(--validate),例如:
1
polygraphy run transformer-init-decoder.onnx --trt
1
2
3
4
5
6
7
8
9
10
11
12
13
14
15
16
17
18
19
20
[I] RUNNING | Command: polygraphy run transformer-init-decoder.onnx --trt
[I] trt-runner-N0-11/08/22-09:39:14 | Activating and starting inference
[W] CUDA lazy loading is not enabled. Enabling it can significantly reduce device memory usage. See `CUDA_MODULE_LOADING` in https://docs.nvidia.com/cuda/cuda-c-programming-guide/index.html#env-vars
[W] onnx2trt_utils.cpp:377: Your ONNX model has been generated with INT64 weights, while TensorRT does not natively support INT64. Attempting to cast down to INT32.
[E] ModelImporter.cpp:726: While parsing node number 144 [Slice -> "onnx::Add_184"]:
[E] ModelImporter.cpp:727: --- Begin node ---
[E] ModelImporter.cpp:728: input: "decoder.embeddings.make_embedding.pe.pe"
input: "onnx::Slice_1420"
input: "onnx::Slice_180"
input: "onnx::Slice_1421"
input: "onnx::Slice_183"
output: "onnx::Add_184"
name: "Slice_144"
op_type: "Slice"
[E] ModelImporter.cpp:729: --- End node ---
[E] ModelImporter.cpp:732: ERROR: builtin_op_importers.cpp:4513 In function importSlice:
[8] Assertion failed: (axes.allValuesKnown()) && "This version of TensorRT does not support dynamic axes."
[E] In node 144 (importSlice): UNSUPPORTED_NODE: Assertion failed: (axes.allValuesKnown()) && "This version of TensorRT does not support dynamic axes."
[!] Could not parse ONNX correctly
[E] FAILED | Runtime: 2.821s | Command: polygraphy run transformer-init-decoder.onnx --trt

从提示信息可以看出,对于模型中的 Slice 操作,不支持动态输入的 axes 值。如果换成 ONNXRuntime 作后端,则会输出 Input/Output 等基本信息以及推理时间,最后输出 PASSED。

  • convert 模式实现 ONNX 模型转为 TensorRT 模型,这个与 trtexec 功能优点类似。例如:
1
2
3
4
polygraphy convert dynamic_identity.onnx -o dynamic_identity.engine \
--trt-min-shapes X:[1,3,28,28] --trt-opt-shapes X:[1,3,28,28] --trt-max-shapes X:[1,3,28,28] \
--trt-min-shapes X:[1,3,28,28] --trt-opt-shapes X:[4,3,28,28] --trt-max-shapes X:[32,3,28,28] \
--trt-min-shapes X:[128,3,28,28] --trt-opt-shapes X:[128,3,28,28] --trt-max-shapes X:[128,3,28,28]
  • surgeon 模式下可以对模型进行常量折叠等优化。例如:
1
polygraphy surgeon sanitize --fold-constants transformer-decoder.onnx  -o transformer-decoder-fold.onnx

NVTX tracing+Nsight System 性能瓶颈分析

  • 首先使用 trtexec 推理的时候添加 --profilingVerbosity=detailed 选项
1
trtexec --onnx=foo.onnx --profilingVerbosity=detailed --saveEngine=foo.plan

或者在应用代码中通过IBuilderConfig进行设置,如下

1
2
3
4
5
6
7
8
9
10
11
12
13
import tensorrt as trt

TRT_LOGGER = trt.Logger(trt.Logger.WARNING)
builder = trt.Builder(TRT_LOGGER)
config = builder.create_builder_config()
# to disable NVTX tracing, set the ProfilingVerbosity to kNONE
# config.profilling_verbosity = trt.ProfilingVerbosity.NONE
# allow TensorRT to print more detailed layer information in the NVTX markers, including input and output dimensions, operations, parameters, tactic numbers, and so on, by setting the ProfilingVerbosity to kDETAILED
config.profilling_verbosity = trt.ProfilingVerbosity.DETAILED

EXPLICIT_BATCH = 1 << (int)(trt.NetworkDefinitionCreationFlag.EXPLICIT_BATCH)
network = builder.create_network(EXPLICIT_BATCH)
plan = builder.build_serialized_network(network, config)
  • 然后再利用 nsys 执行模型推理过程 nsys profile -o ${nsys_output_name} --capture-range ${api_name} ${command_for_run_tensorrt_inference},例如:
1
nsys profile -o foo_profile --capture-range cudaProfilerApi trtexec --loadEngine=foo.plan --warmUp=0 --duration=0 --iterations=50
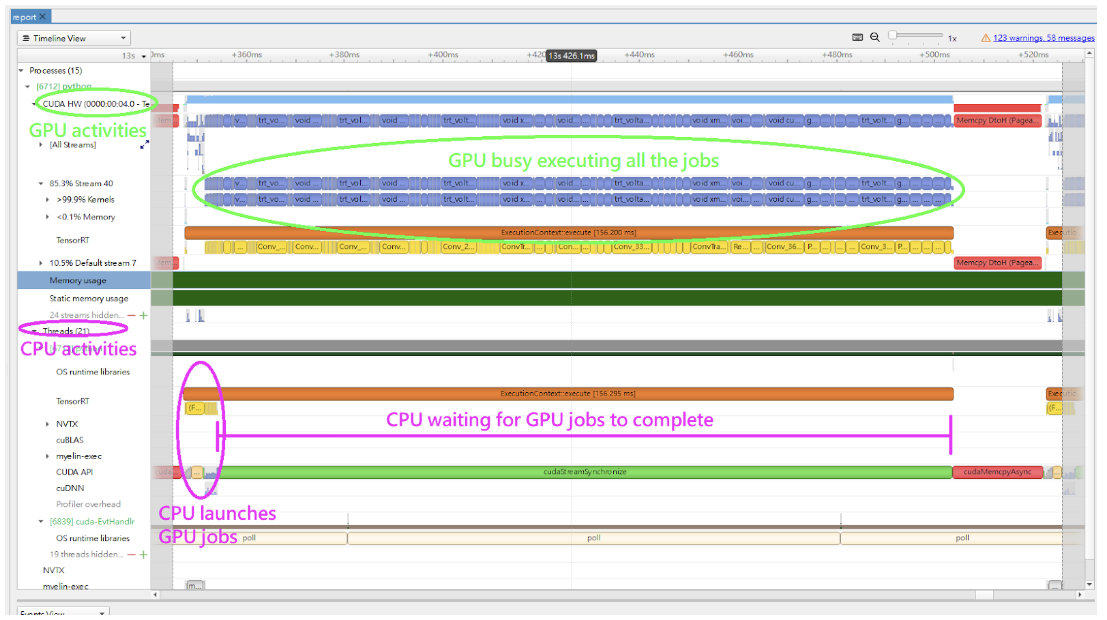
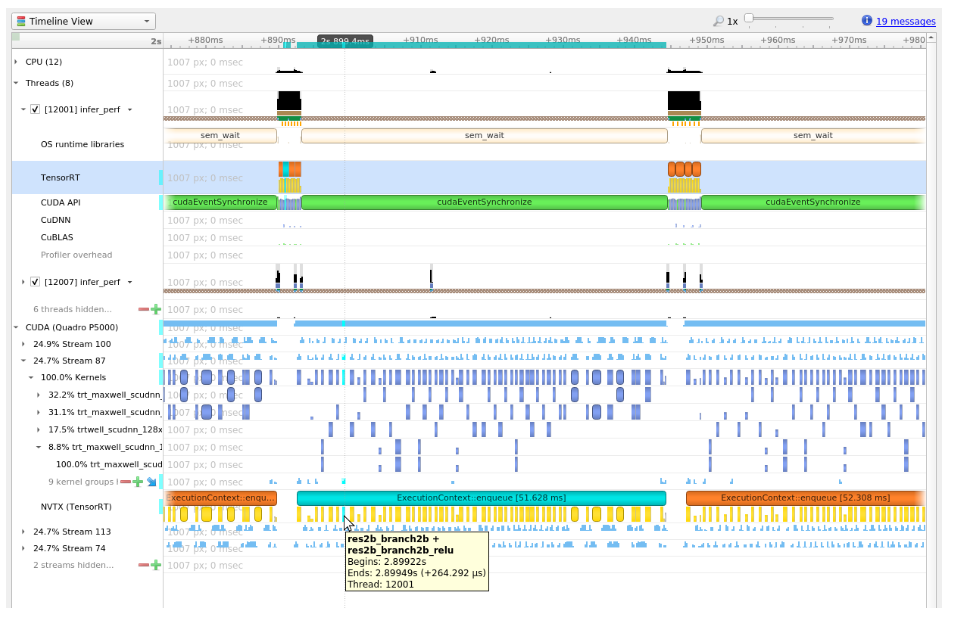
  • 使用 Nsight System 打开输出的结果文件, 结果中包括多种 level 多种设备上的时间占用情况,如下图所示:
runtimeline view
kernel time

  1. https://docs.nvidia.com/deeplearning/tensorrt/developer-guide/index.html#troubleshooting "tensorrt常见问题"↩︎

  2. https://netron.app/↩︎

  3. https://github.com/ZhangGe6/onnx-modifier↩︎

  4. https://github.com/daquexian/onnx-simplifier↩︎

  5. https://docs.nvidia.com/deeplearning/tensorrt/polygraphy/docs/index.html ↩︎↩︎

  6. https://docs.nvidia.com/deeplearning/tensorrt/developer-guide/index.html#trtexec↩︎

  7. https://docs.nvidia.com/deeplearning/tensorrt/onnx-graphsurgeon/docs/index.html "ONNX GraphSurgeon"↩︎